Wednesday, February 29, 2012

Baby On A Budget Part II: Re-Cover

So like I've mentioned, we've been so lucky in getting hand me down and/or very low cost furniture for the baby's room.  However, not lucky enough that everything matches.  Over the last couple of weeks I tackled the project(s) that I was totally dreading.  Painting and re-covering a glider and ottoman that my mom gave us. 

So check out where these guys started:


And what we got to fix them up:

First of all, they started in our garage, so they were clearly nice and dusty. We wiped them down and painted the wood on both to match the changing table Dave's work friend so nicely handed down to us.  The paint was awesome, and only took one coat.  However if you'll check out all the nice slats and poles and other small areas to paint on the glider, I had to touch up several times.  I hated every second of painting that, I won't lie, but I do LOVE how it looked when it was done.
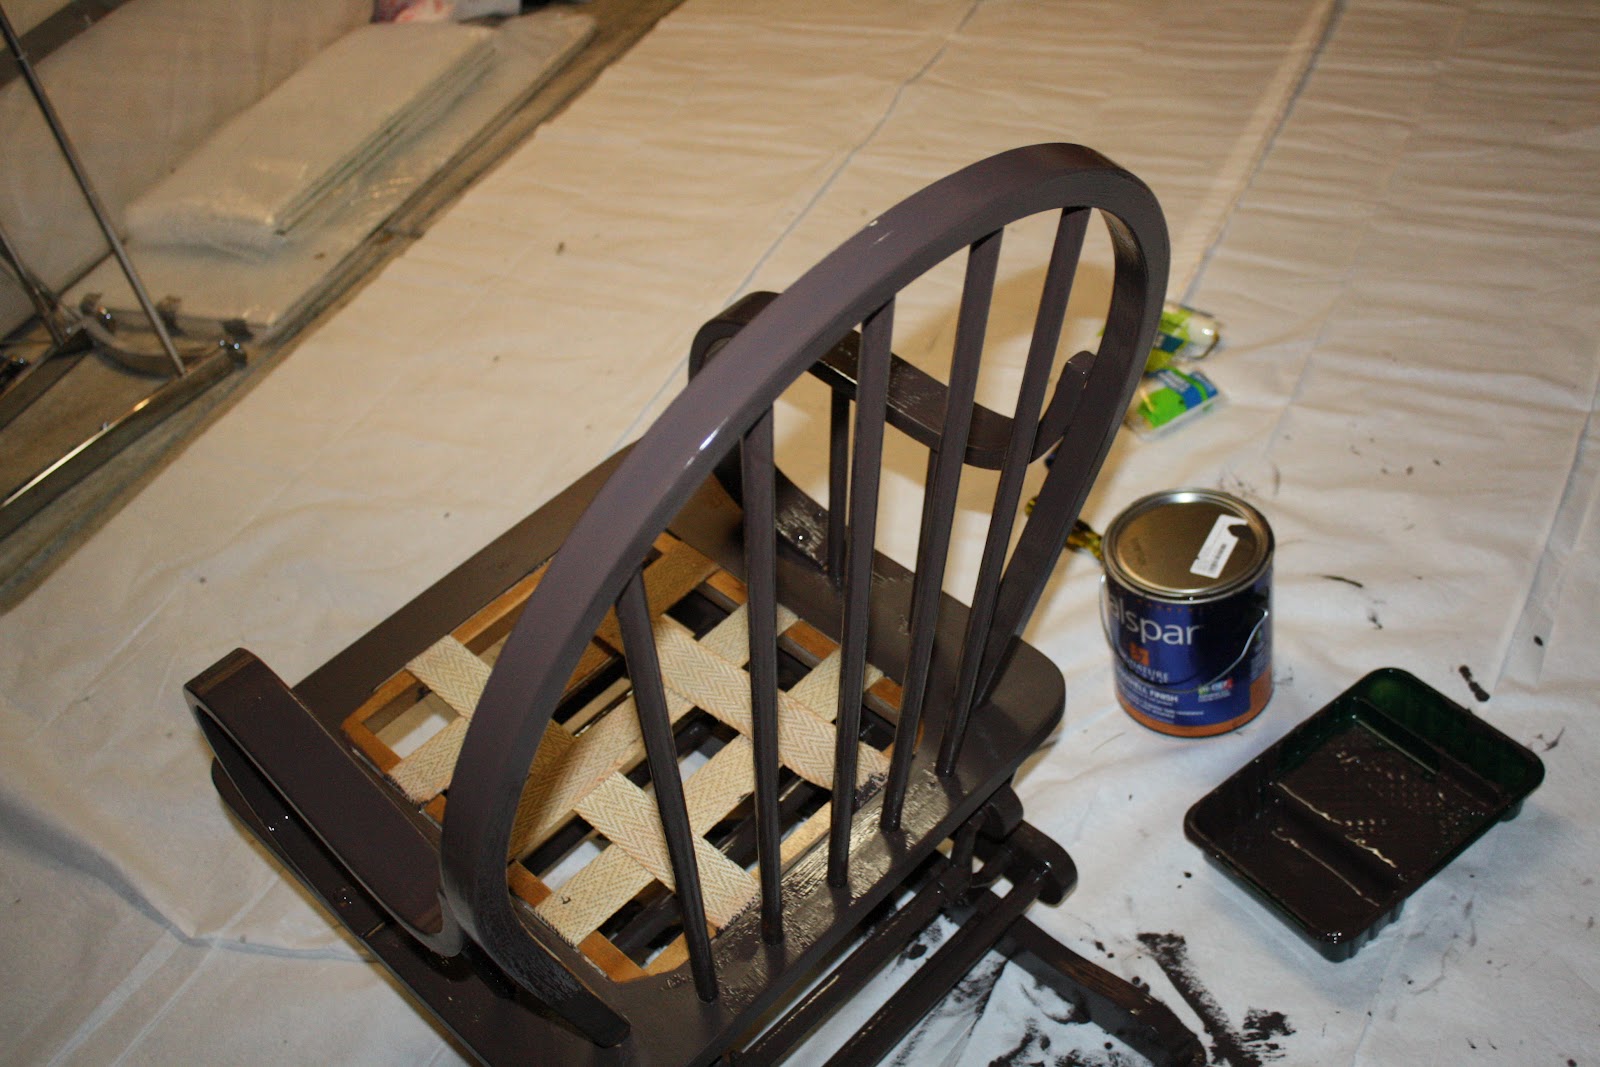

After the paint had dried on both for about 24 hours, we used a spray lacquer to cover both of them to protect the paint and add some shine.  This is not the same stuff we'll use to finish the crib, but that's a whole other story.

Once they were dried and set, we moved them up to the baby's room to work on recovering them.  I decided to tackle the ottoman first, since I could do that without monopolizing my mom's sewing machine.

I had purchased some batting at JoAnne's to fill in where the ottoman was sagging a bit in the middle.  I folded about 3 layers over and placed them on top.  Looks great, I know.


Then after playing around with different options for covering this for a good half an hour, I had Dave come in for a consultation.  Clearly his engineer brain had a better idea than mine in like 4 minutes.  I won't even bore you with the options I tried out, but we ended up cutting a big piece of batting (enough to cover the top and sides over the red) and tacked it down in the inside.  We just used small wood tacks and a hammer.  I would recommend a thicker tack than we used, because ours bent really easily.


 So, when the batting was all tacked in, it looked like this:


The hardest part for me was the corners.  I couldn't figure out how I wanted to secure them, but I ended up kind of folding them under and tacking them on the bottom, kind of like wrapping a present.  I then did the same step with the fabric I bought to cover them.  I found a BOLT, a whole BOLT of navy fabric for $5 at WalMart.  Awesome.  Even if I messed it up totally, not a huge financial loss there.

You can see the corners a bit more on the finished product:


Ta Da.  Now don't get me wrong, I fought with that stupid batting for a good hour or so.  I wanted to kill someone. These 3 pictures make it look much easier than it was, but also just goes to show, anyone can do it.

About a week later, when I recovered from the ottoman stress, I decided to get it over with and recover the glider cushions.  I used the same fabric so the two pieces would match, but I cannot take credit for literally any of the process beyond that.  I simply pinned the fabric (inside out) around the current cushions and cut the fabric out around the pins, leaving an inch or so for error.  Those bad boys I took to my mom's for her to work her magic on.  She sewed around the cushions, we turned the covers right side out, put them back on and stitched them up.  Again, sounds a BIT easier than it was.

BUT check it out now, much better:


And the both of them together:


And a wider shot of the only finished corner of the baby's room (you don't want to see the other side):


Def making progress!  Don't worry - that small table will get the dark brown treatment shortly.  As soon as I can think about painting anything else, now that we're mid-crib painting.  Again - a whole other story, that one.  It's a beast.

So it definitely took some time and elbow grease - but probably only about $40 for the both of them including paint, fabric and spray finish.  So, in other words, totally worth it.  I'm obviously just saying that now that I'm done.

Baby Yar better appreciate it's matching room.  I know.  Clearly babies think about that kind of thing.

More fun stuff coming soon!

Friday, February 24, 2012

Goldfish?


So today makes 18 weeks for Baby Yar.  Time just keeps flying!  We find out Monday if it’s a he or she Yar, and are very excited about that.  Clearly.

Baby Yar is starting to really move around in there.  I can’t feel any distinct punches or kicks yet but it does very much feel like there is a goldfish swimming around in my stomach at times.  Lots of random wavy feelings.  I started feeling those the day Bowen (our sweet little nephew) was born.  Clearly Baby Yar is excited to meet him!

He or she can hear, and see (light that is) – its eyes are still closed.  Today it’s about five and a half inches long (not including its legs, which will inevitably be super long) and weighs about 5 ounces.  Not quite fully baked yet!

We’ve made more progress on nursery furniture updating, and bought a car seat last weekend.  Yikes!  Very weird to see it sitting in our living room.  I’m very excited to start buying massive amounts of cute, tiny clothes once we find out the sex of the baby.  I’m sure our checking account is not as excited.

Stay tuned for the big gender reveal and some furniture updates coming soon!

Thursday, February 9, 2012

How To: Put a duvet cover on without crawling inside of it.


This was a big problem for me back in the day.  I had a down comforter, with a duvet, that had a VERY small hole.  In order to get a non-clumpy finished product, you were supposed to stuff the comforter through the hole, crawl in, grab a corner and scoot towards the back end of the duvet, all while holding the comforter and not schrunching up both layers up all over the floor and/or bed. 

There HAS to be a better way, right?  There totally is.  I learned this when we got an awesome hand me down comforter from two of our good friends.  The first time I went to wash the duvet, I found these little clips on all four edges. 


I was very confused for a hot minute, but then I realized my friend Julie is the smartest person in the world.  She clearly used those clips to avoid the crawl and scootch moves I was using to put my duvet on.

Since we just got a new duvet cover for our bedroom, I figured I’d show you all this little trick.  To clarify, the new duvet cover was necessary due to the fact that we bought a black comforter before we bought our tan, crazily shedding dog.  In addition, I was over the dry cleaner people making fun of me when I dropped off the comforter, so I figured being able to simply wash a cover in the privacy of my own home would be much better.

So, I just lined up the comforter and duvet on the edge of the bed.  Duvet needs to be inside out!


Then clipped the overlapping edges with these lovely little clip guys and made sure it was pulled tight across and both the comforter and duvet cover were even.  


Then you simply pull the cover up around the comforter to the top.  Since this is the first duvet cover I have bought in like 10 years, they have gotten a little more technologically advanced.  The bottom has this lovely little pocket to place the edge in, so I really only needed two of the clips.


Then you just close up the cover, shake it out a few times while holding on to the clipped ends and you have a lovely, non-bunched up comforter.  


And also you’re not sweaty and frustrated from crawling around in a large cloth cotton death trap.

Win win for everyone!  Except Dexter.  I'm fairly certain he's mad that he will no longer be able to see his fur everywhere.


Monday, February 6, 2012

Baby on a Budget – Part 1. Work with what you’ve got and DIY.

We’re having a baby on a budget.

Not sure if you all have noticed, but having a baby can be incredibly expensive.  There are so many options out there when it comes to cribs, strollers, bedding, changing tables, bottle warmers, etc.  I could go on for days, but you get the idea.  Some of these big ticket items in particular are not very nice to one’s budget.  And, personally, I would rather drop a grand on some sort of tropical vacation with fruity drinks than on a stroller and car seat (no offense intended Baby Yar). 

This, my friends, is why my husband and I have been trying to come up with any and all ideas to get this baby here for a reasonable price.  And, because I love to share (and over share), I will pass what we come up with along to all of you, just in case there is anyone else out there attempting to still have a balance in their savings account after the birth of their child.

We started by thinking about the nursery, clearly an easy place to start.  Luckily, our extra bedroom is currently painted a very light brown, which is the color it will stay for multiple reasons.  One, to save money and time on repainting.  Two, we will probably put our house on the market within the next few years and didn’t want to create a unique nursery specific color palette and/or design that we would have to re-paint eventually for resale value.  Three, we may have more than one kid in that room at some point and brown is nice neutral color that goes easily with any other color.  Which conveniently leads me to my next point, go gender neutral.

Now, I never thought I would be a gender neutral person (pink or blue all the way!), but thanks to my loving, rational husband, I realized the actual genius behind this idea.  Now, I clearly am not the first or the only person to realize this, since there is currently a great market for gender neutral baby products.  But, for our situation it makes SO much sense, budget and space wise. 

So, because I felt the need to start working on the room immediately, I made a pin board of nurseries that I liked and shared them with Dave.  We both were leaning towards nurseries that used blues and greens, with some yellow and/or orange accents (what boy OR girl wouldn’t love those colors?).  So, then I made a trip to JoAnne Fabric (they will cut you an inch of fabric for free!) to grab a few samples of colors/patterns that I liked to run by Dave for male approval.

We narrowed down our color scheme and then I started browsing online to find other patterns that may work for curtains (my initial DIY project).  Curtains can be crazy expensive, and it can be hard to find exactly what you want.  So I thought hey, those can’t be too tough to throw together, let’s do that.  Luckily I was right. 

In my online browsing, I found several very cool fabric websites (Fabric Worm and Contemporary Cloth were two of my faves) both of which had great patterns at fairly reasonable prices.  But, in the end, I found the fabric we went with a good old JoAnne’s.  They were having a 40% off sale on all of their cotton fabrics, yay, and I found a great green/blue/yellow paisley pattern that I LOVED.  And hoped Dave would also.  So, I bought six yards (two separate 3 yard panels) for $19.50 total.  Awesome.


So this past Sunday, I spent 5 or so hours at my mom’s (who generously donated her ironing board, sewing machine, thread AND sewing expertise to help with the cause) making curtains.  It really was a fairly simple process.  I found a great tutorial here that I referenced before I went over, just so I had some idea of what I was doing.  We followed it pretty closely, but let me know if you have any questions!

We used the same curtain rod we had already up in the room - so when we finished I just had to hang them!    I think they look pretty good!


Stayed tuned for more DIY projects.  Painting baby furniture is next on the list!


Friday, January 27, 2012

14 Weeks.


Which now, by all accounts, means that I am done with my first trimester!  Exciting.  These 14 weeks have FLOWN by, and although pregnancy has been pretty good to me so far, the last couple weeks of the first trimester were maybe the worst.  

Now, don’t get me wrong, from what I’ve been hearing lately, my “worst” is pretty much better than most other people’s “great”.  I was nauseous a little more frequently (nothing crackers at my desk couldn’t take care of), was really SUPER tired, and just lately I’ve started getting hungry ALL THE TIME.  

Now, I never thought there would come a day when I would say that as a negative thing (since eating could be counted as one of my hobbies) but this hunger wakes me up from naps, makes me leave meetings to get a snack, and just won’t stop. I mean, I love eating as much as the next person, but this is getting a bit excessive!

Ahh I know.  Big problems over here.

In other news, we picked out curtains for the baby’s room (a fun green/blue paisley pattern), got a changing table, crib, glider and ottoman (ALL hand me down, and thus very cheap, or free, YAY!), so we are pretty set as far as big ticket baby items!  We have some staining and recovering projects to do, but hopefully we’ll start and finish those over the next few months.  We're hoping the nursery will be done well before the summer!

We go to the Doctor next Wednesday for our 15 week appointment, and then our next (19 week) appointment is the big gender reveal!  We’re getting very excited about that.  Can’t wait to see if we’ll have a boy or girl to fill those little shoes!

Sunday, January 22, 2012

Pinterest Project Dos (as in the Spanish word for two)

Ok so clearly I have been creepily obsessed with Pinterest lately.  It's kind of embarrassing, I know, but whatev.  So for a dear, crafty totally unique friend (love you Ash) of mine's wedding shower in November (yes this post is late, I know) I decided to see if I could find something on Pinterest to use as inspiration for her gift.

In one of my searches I found this super cute wedding frame pin that I wanted to try and recreate, but as I was thinking about it, I got all sorts of other crazy ideas, so needless to say, it took a few twists and turns and became a creation of its own.

I decided I wanted to incorporate her wedding colors (yellow and blue), as well as the lyrics to their first dance song (like in the pin).  So, as a starting point, I went to Goodwill to look for a good wood frame to work with.  That's where I found a $3 gem shown below.  Sweet angel print, I know.

Then, I headed to Michael's to find some custom matting to work within the frame and still hold a 5" x 7" photo.  I chose two different sizes so that they would layer on top of each other.  I also then went to the paint section to look for something to write the lyrics in (blue) and something to paint the frame with (yellow).  So I ended up with the below.  You can see her wedding colors there as well.


Next step was to paint the frame.  I painted a couple of coats in a couple of days.


 Then, since it wasn't finishing perfectly (there were some lumps/bumps) I decided to sand it down to give it a weathered look.  It actually ended up working out perfectly because with the yellow paint on top, the green frame showed through as a bluish color.  


Then I glued the matting together and got ready to write the lyrics to their first dance song on the matting.  I was TENSE about this.  I do not have the best handwriting in the world (maybe the worst) and after agonizing about other possible ways to get the words on the matting, decided I was just going to have to suck it up and go for it.

I decided to write the words in a pattern around (not straight across) the frame as you can see below, so she could eventually use a vertical or horizontal image in the frame and either would work.

Then I printed out one of their engagement shoot images which matched PERFECTLY and put the whole thing together.  Ta-da!


I thought it came out pretty nicely.  I think she liked it too.  If not, she's a good faker and I'll know she secretly hated it if I never see it in her house ;).

So there is my Pinterest project number 2.  Get ready for a ton more of those.  We have approximately 345234 planned for this baby's nursery, in an attempt to save some money and make it a super cool, unique room.

Happy crafting everyone!

Thursday, January 12, 2012

We're having a baby?


Yes, as I’m sure all of you know, since anyone who reads this is a friend or family member of mine, Dave and I are having a baby in July (this is news is partially to blame for my general lack of blogging over the past two months).  Baby Yar is due July 27th and probably, at 12 weeks, already measuring more like the size of 20.  Dave and I’s favorite game is to joke about the abnormally large size our child will be born at.  Maybe even record breaking.  Who knows?  Get excited.

We found out November 17th that after just a couple months of trying, we were expecting a little one. 

Side Note:  NEVER take a pregnancy test before you go to work and expect to do anything but stare at your monitor all day if it’s positive.  Stare at the screen AND/OR look up what the margaritas you drank the weekend before did to your poppy seed sized child (don’t worry – the answer is nothing!).

Yikes.  Don’t get me wrong, we are incredibly excited about this little one, but it is just HUGE.  HUGE life change, HUGE commitment, HUGE.  We have spent the past several months getting used to the idea that there will be a third person in our household this summer (four including Dexter, clearly).  It’s fun, exciting and terrifying all at once.

There are all sorts of questions like, how will Dave and I handle this?  Will it change our relationship?  Will he love the baby more than me?  Will I be bitchy and mean to everyone because of the severe lack of sleep that comes with a newborn?  Where are we going to put all the baby’s stuff?  Could I be more excited about 12 weeks off of work???  Holy shit, what are we going to do with a baby, and toddler, and teenager?? And the list goes on and on and on and on.  Mostly irrational pregnant craziness.  But, please note, if any first time pregnant person tries to  tell you they haven’t had lots of scary, crazy thoughts (on top of all the great, exciting ones) they are TOTALLY lying to you.

Health-wise, I have been incredibly lucky this whole first trimester, no morning sickness AT ALL, no weird cravings or aversions to food or smells, nothing except a few cramps and total exhaustion.  The baby’s heart beat is good and strong and both ultrasounds (at 6.5 and 8.5 weeks) have shown that it’s right where its supposed to be and growing just like it’s supposed to!  We’ll find out around the first of March if it’s a little chica or chico hanging out in there.  We cannot wait!  Well; mostly I cannot wait, since as all of you know, I have major patience issues.

So there you have it.  A brief summary of the life and times of Baby Yar to date.  Dave and I are totally thrilled to be adding a member to our family and can’t wait to see what this year holds for us!  Thank you so much to all of you for all of your happiness, support, love, prayers, gifts and advice.  It has been overwhelming, and you people have only known for 3 weeks!  We are so lucky and blessed to be surrounded by such wonderful family and friends.  Look for more Baby Yar news soon!